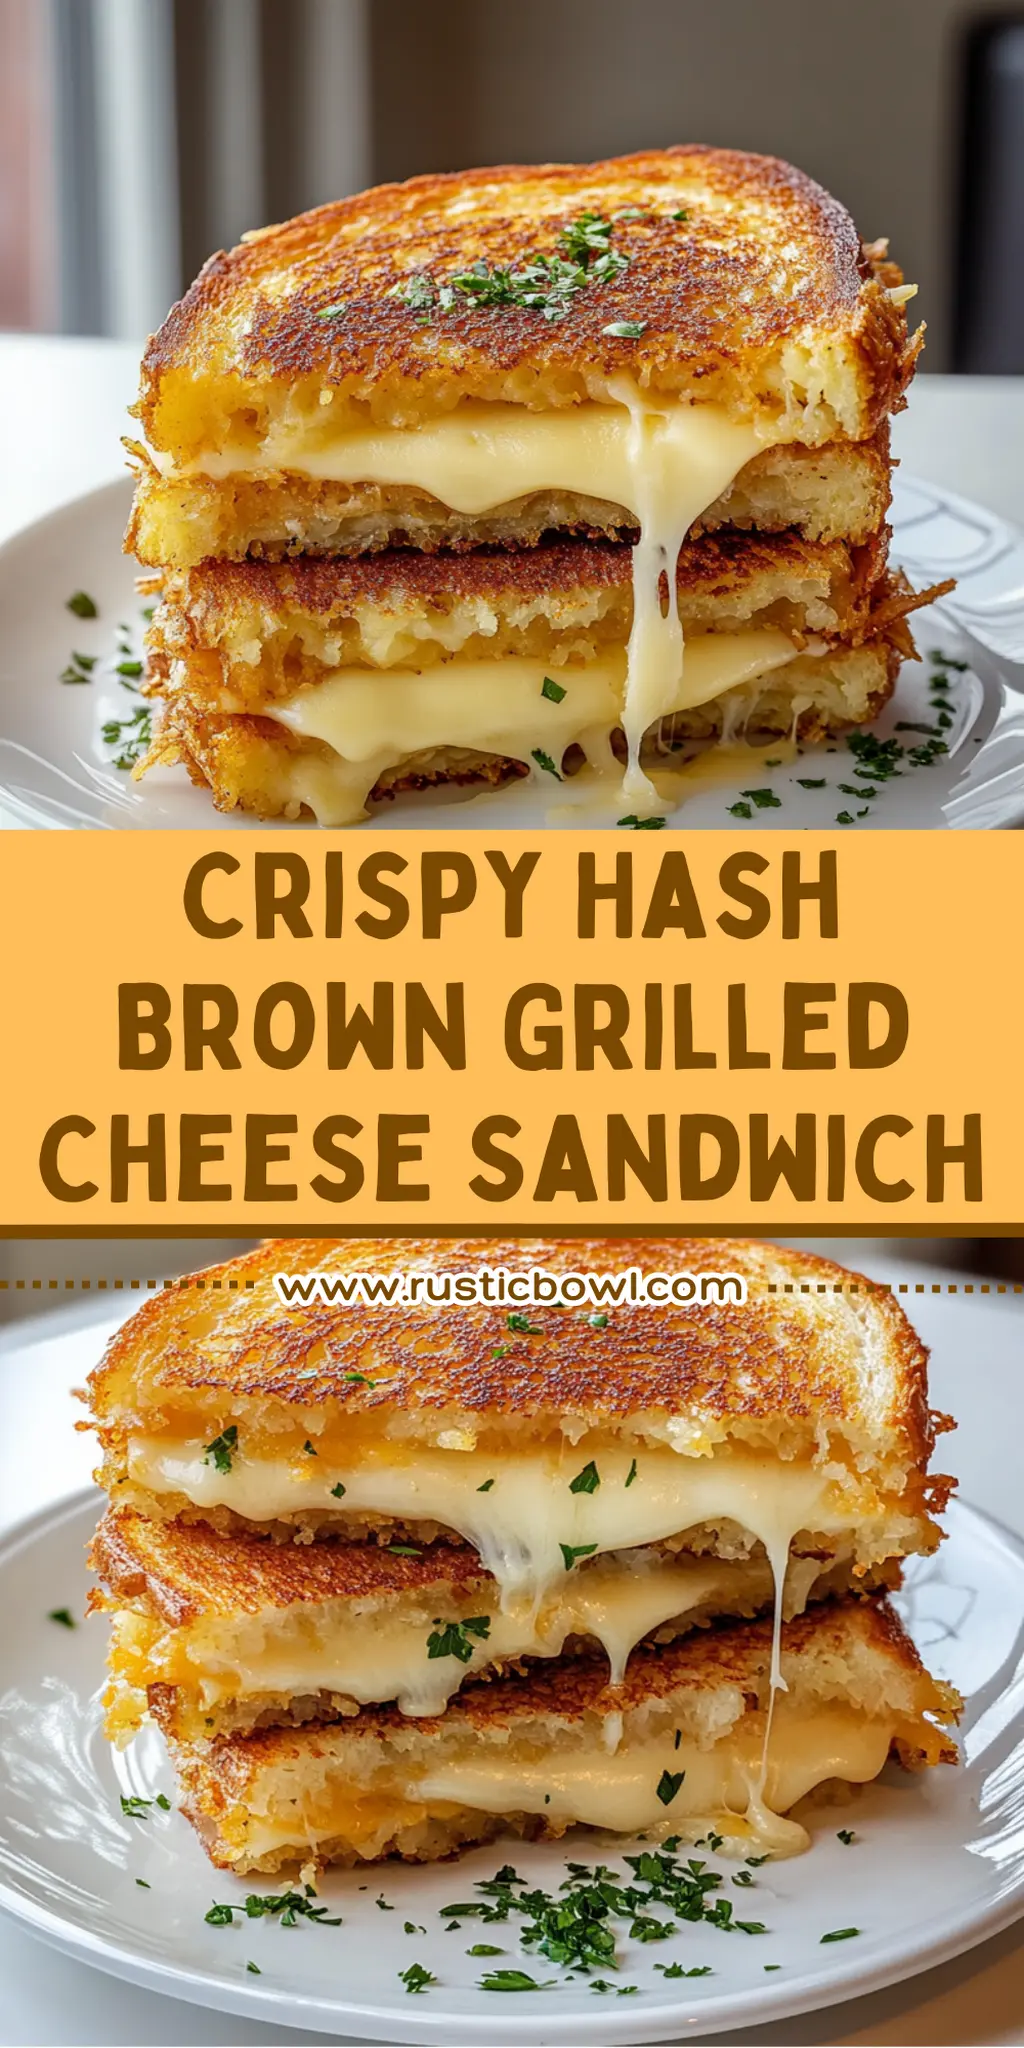
After a long day of navigating life’s hustle and bustle, there’s nothing more comforting than a warm, crispy sandwich. Imagine biting into a Crispy Hash Brown Grilled Cheese Sandwich, where layers of gooey melting cheese meet the crunch of golden hash browns. The delightful contrast between the buttery bread and the savory fillings creates a moment of pure happiness.

On one of those particularly lazy Sundays, I found myself craving something indulgent yet surprisingly easy to whip up. With just a couple of frozen hash browns in my freezer and a few slices of bread, I stumbled upon this delightful creation that turned an ordinary meal into a gourmet experience.
Whether you’re a busy professional seeking to elevate your weeknight meals or a weekend warrior wanting to impress your family, this dish delivers on flavor while giving you room to play with ingredients like crispy bacon or caramelized onions. The best part? It all comes together in under an hour, making it the perfect remedy for fast-food fatigue. Let’s dive into the simple steps to create your new favorite sandwich!
Why You'll Love This Crispy Hash Brown Grilled Cheese Sandwich
- This Crispy Hash Brown Grilled Cheese Sandwich is incredibly easy to make, allowing anyone to prepare a delicious meal in no time.
- The burst of gooey, melted cheese combined with crispy hash browns creates a flavor explosion that will delight your taste buds.
- With its versatile ingredients, you can customize your sandwich with add-ons like beef bacon or jalapeños to suit your preferences.
- Visually appealing and golden-brown, this sandwich is sure to impress at any gathering, making it a true crowd-pleaser.
- Whether you’re craving comfort food or a gourmet twist on a classic, this recipe hits all the right notes.
Crispy Hash Brown Grilled Cheese Sandwich Ingredients
For the Sandwich
• Frozen Hash Brown Patties – perfectly crispy when cooked, these are the star of your crispy hash brown grilled cheese sandwich.
• Sliced Bread – choose your favorite type; thicker slices yield a heartier bite.
• Good Melting Cheese – opt for varieties like cheddar or mozzarella for the best gooeyness.
• Butter or Mayonnaise – use for spreading on the bread to achieve that golden, crispy crust.
Optional Fillings
• Cooked Beef Bacon – adds a savory, smoky flavor that perfectly complements the sandwich.
• Caramelized Onions – these bring a sweet, rich depth to your meal, elevating every bite.
• Jalapeño Slices – a zesty kick for those who love a little heat.
• Hot Sauce – drizzle for an extra layer of flavor to tantalize your taste buds!
With these ingredients, you’re just moments away from a crispy hash brown grilled cheese sandwich that will become a staple in your home-cooked meals!
How to Make Crispy Hash Brown Grilled Cheese Sandwich
- Cook the frozen hash brown patties in an air fryer at 400°F (200°C) for about 10-15 minutes, until they’re golden brown and irresistibly crispy. You can also bake them in the oven or skillet if preferred.
- Spread softened butter or mayonnaise on one side of each slice of bread. On the unbuttered side of two slices, sprinkle a generous layer of your chosen cheese blend for that creamy goodness.
- Layer one crispy hash brown patty on top of the cheese on one slice of bread. Add optional fillings like beef bacon, caramelized onions, or jalapeños if you’d like. Top it off with another layer of cheese and place the second slice of bread, buttered-side-up, on top.
- Heat a non-stick skillet over medium-low heat. Carefully place the assembled sandwich in the skillet and cook for about 3-5 minutes per side, until the bread is golden brown and the cheese melts beautifully. Press down gently with a spatula for even browning.
- Slice the sandwich in half on a cutting board and serve hot, savoring those melty layers!
Optional: Add a drizzle of hot sauce for a zesty kick!
Exact quantities are listed in the recipe card below.
Make Ahead Options
These Crispy Hash Brown Grilled Cheese Sandwiches are perfect for meal prep enthusiasts! You can cook the hash brown patties up to 24 hours in advance and store them in an airtight container in the refrigerator. Additionally, you can assemble the sandwiches (without cooking the bread) and keep them layered in the fridge for up to 3 days—just be sure to place parchment paper between each sandwich to prevent sticking. When it’s time to enjoy, simply heat a non-stick skillet over medium-low heat and cook the sandwiches straight from the fridge for about 3-5 minutes per side, ensuring that the cheese melts to gooey perfection. This way, you get restaurant-quality results with minimal effort, making weeknight dinners a breeze!
What to Serve with Crispy Hash Brown Grilled Cheese Sandwich?
Transform your meal into a gratifying experience by pairing textures and flavors that complement this delicious sandwich.
- Tomato Soup: The classic pairing that adds a rich, comforting contrast to the crispy texture.
- Sweet Potato Fries: Their natural sweetness provides a delightful balance, making your meal even more satisfying.
- Mixed Green Salad: A refreshing side bursting with crunchy vegetables and tangy dressing adds brightness to your plate.
- Coleslaw: Creamy or vinegar-based, it offers a crunchy and zesty complement that cuts through the sandwich’s richness.
- Pickles: Their briny crunch adds a punch of flavor, making each bite more enjoyable and layered with taste.
- Sparkling Lemonade: Its citrusy fizz provides a refreshing contrast, cleansing your palate between bites.
Each of these pairings invites you to create a hearty, well-rounded meal, ensuring that your time in the kitchen is as delightful as it is delicious!
How to Store and Freeze Crispy Hash Brown Grilled Cheese Sandwich
Room Temperature: Best enjoyed fresh, but if you need to store, keep it at room temperature for no more than 2 hours to maintain quality.
Fridge: Place leftover crispy hash brown grilled cheese sandwiches in an airtight container and refrigerate for up to 3 days. Reheat in a skillet for a crispy finish.
Freezer: For longer storage, freeze the assembled sandwiches wrapped tightly in plastic wrap and then in foil for up to 3 months. Thaw before reheating.
Reheating: To enjoy your crispy hash brown grilled cheese sandwich again, heat in a skillet over medium-low heat, cooking each side for 3-5 minutes until heated through and crispy again.
Crispy Hash Brown Variations
Feel free to let your creativity shine and customize your delicious sandwich with these exciting twists!
-
Dairy-Free: Substitute dairy cheese with plant-based cheese for a creamy and delightful vegan experience.
A nutty cashew cheese spread can also bring a unique flavor that’s super satisfying. -
Gluten-Free: Use gluten-free bread for a sandwich everyone can enjoy without missing out on taste.
A hearty gluten-free bread with a nutty flavor enhances the overall experience. -
Spicy Twist: Add a layer of pepper jack cheese or a few dashes of your favorite hot sauce for a fiery kick!
This adds a zing that brings balance to the richness of the cheese and hash browns. -
Veggie-Packed: Include roasted bell peppers, spinach, or mushrooms for added nutrition and a burst of color.
The veggies bring a wonderful earthy flavor that complements the crispy textures beautifully. -
Breakfast Delight: Elevate your sandwich by adding a fried egg on top of the hash browns for a brunch-worthy treat.
The rich yolk adds creaminess, taking your sandwich experience to the next level. -
Herb Infusion: Mix fresh herbs, like basil or chives, into the cheese layer for added freshness and aroma.
These herbs bring an aromatic lift that makes each bite feel like a special occasion. -
Sweet Crunch: Add thin slices of apple or pear for a surprising sweet crunch that contrasts wonderfully with the savory flavors.
This unexpected twist will have your taste buds dancing and craving more. -
Epic Loaded Sandwich: Go all out! Add different meats like turkey or ham, plus all the optional fillings, for a true feast!
Layering multiple flavors transforms your humble grilled cheese into a legendary sandwich masterpiece.
Chef's Helpful Tips
- To achieve the perfect crispy texture in your Crispy Hash Brown Grilled Cheese Sandwich, ensure your hash browns are cooked entirely until golden brown, which can be done in an air fryer or skillet.
- A common mistake is using cold or hard butter; instead, opt for softened butter or mayonnaise to spread evenly on the bread for a golden crust.
- When layering your sandwich, remember to balance the ingredients with cheese both below and above the hash brown to ensure melt and flavor integration.
- For optimal melting, cook your sandwich on medium-low heat to allow the cheese to melt thoroughly without burning the bread.
Crispy Hash Brown Grilled Cheese Sandwich Recipe FAQs
How do I choose the best frozen hash browns?
Absolutely! Look for frozen hash brown patties that are golden in color and free from any dark spots or freezer burn. Brands that list “100% potatoes” as the only ingredient tend to yield the best results. If you’re feeling adventurous, you can even make your own from freshly grated potatoes for an extra delicious twist!
How should I store leftover sandwiches?
Very! To keep your crispy hash brown grilled cheese sandwich fresh, place leftovers in an airtight container and refrigerate for up to 3 days. When you’re ready to eat, reheat them in a skillet on medium-low heat for that delightful crispy finish.
Can I freeze my sandwiches for later?
Absolutely! To freeze, assemble your sandwiches, then wrap them tightly in plastic wrap followed by aluminum foil to prevent freezer burn. They can be stored in the freezer for up to 3 months. When you’re ready to enjoy, let them thaw in the refrigerator overnight and reheat in a skillet for that fresh-made taste!
What if my cheese isn’t melting well?
Oh no! If you find that your cheese is not melting as it should, it may be too cold or you’ve used a lower-quality cheese that doesn’t melt well. I recommend using a cheese that melts smoothly, like mozzarella or cheddar. Also, ensure you’re cooking over medium-low heat to allow the cheese to gradually melt while you achieve that perfect golden crust on the bread.
Can I make this recipe gluten-free or dairy-free?
Absolutely! If you’re looking to make a gluten-free version, choose gluten-free bread and ensure your hash browns contain no wheat. For a dairy-free option, try a dairy-free cheese alternative made from nuts or soy. This way, everyone can enjoy the deliciousness of a crispy hash brown grilled cheese sandwich!
Are there any pet allergies I should be aware of?
Very! If sharing with furry friends, be cautious of ingredients like cheese and bacon, which can be rich in fat and may not be suitable for dogs. Always check with your vet for specific dietary restrictions regarding your pet’s health, and keep those delicious sandwiches all to yourself!
Equipment
- Air fryer
- skillet
Ingredients
For the Sandwich
- 2 patties Frozen Hash Brown Patties Cook until golden brown
- 4 slices Sliced Bread Thicker slices yield a heartier bite
- 1 cup Good Melting Cheese Cheddar or mozzarella works best
- 2 tablespoons Butter or Mayonnaise For spreading on the bread
Optional Fillings
- 2 slices Cooked Beef Bacon Optional
- 1 small Caramelized Onions Optional
- 4 slices Jalapeño Slices Optional
- 1 tablespoon Hot Sauce Optional
Instructions
How to Make Crispy Hash Brown Grilled Cheese Sandwich
- Cook the frozen hash brown patties in an air fryer at 400°F (200°C) for about 10-15 minutes, until they're golden brown and irresistibly crispy.
- Spread softened butter or mayonnaise on one side of each slice of bread. On the unbuttered side of two slices, sprinkle a generous layer of your chosen cheese blend.
- Layer one crispy hash brown patty on top of the cheese on one slice of bread. Add optional fillings like beef bacon, caramelized onions, or jalapeños. Top it off with another layer of cheese and place the second slice of bread, buttered-side-up.
- Heat a non-stick skillet over medium-low heat. Carefully place the assembled sandwich in the skillet and cook for about 3-5 minutes per side, until the bread is golden brown and cheese melts.
- Slice the sandwich in half on a cutting board and serve hot, enjoying those melty layers!

Leave a Comment