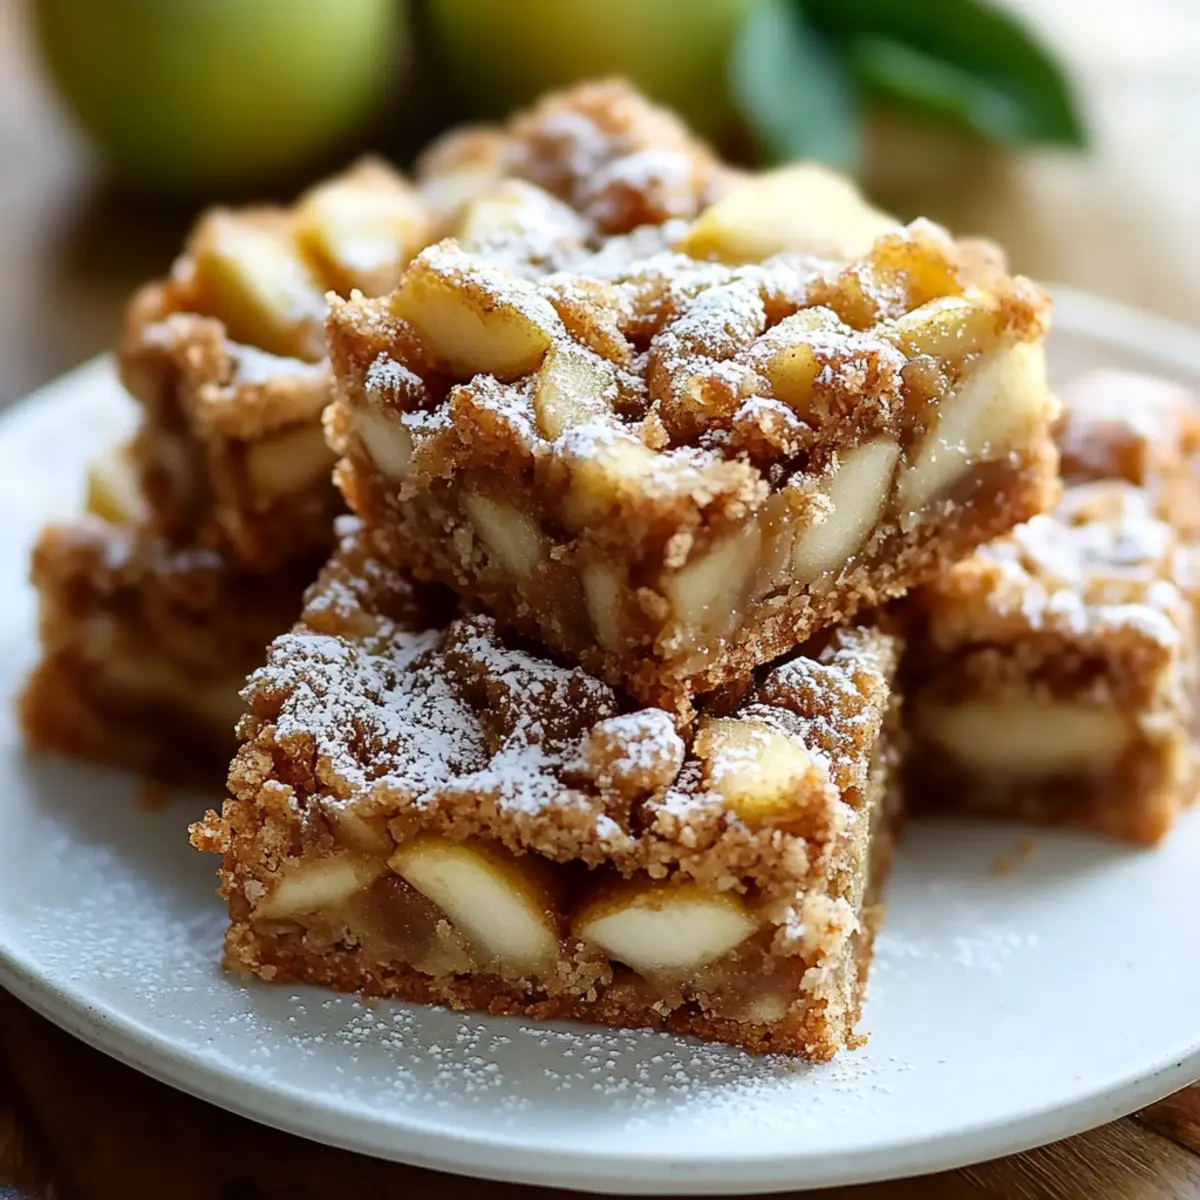
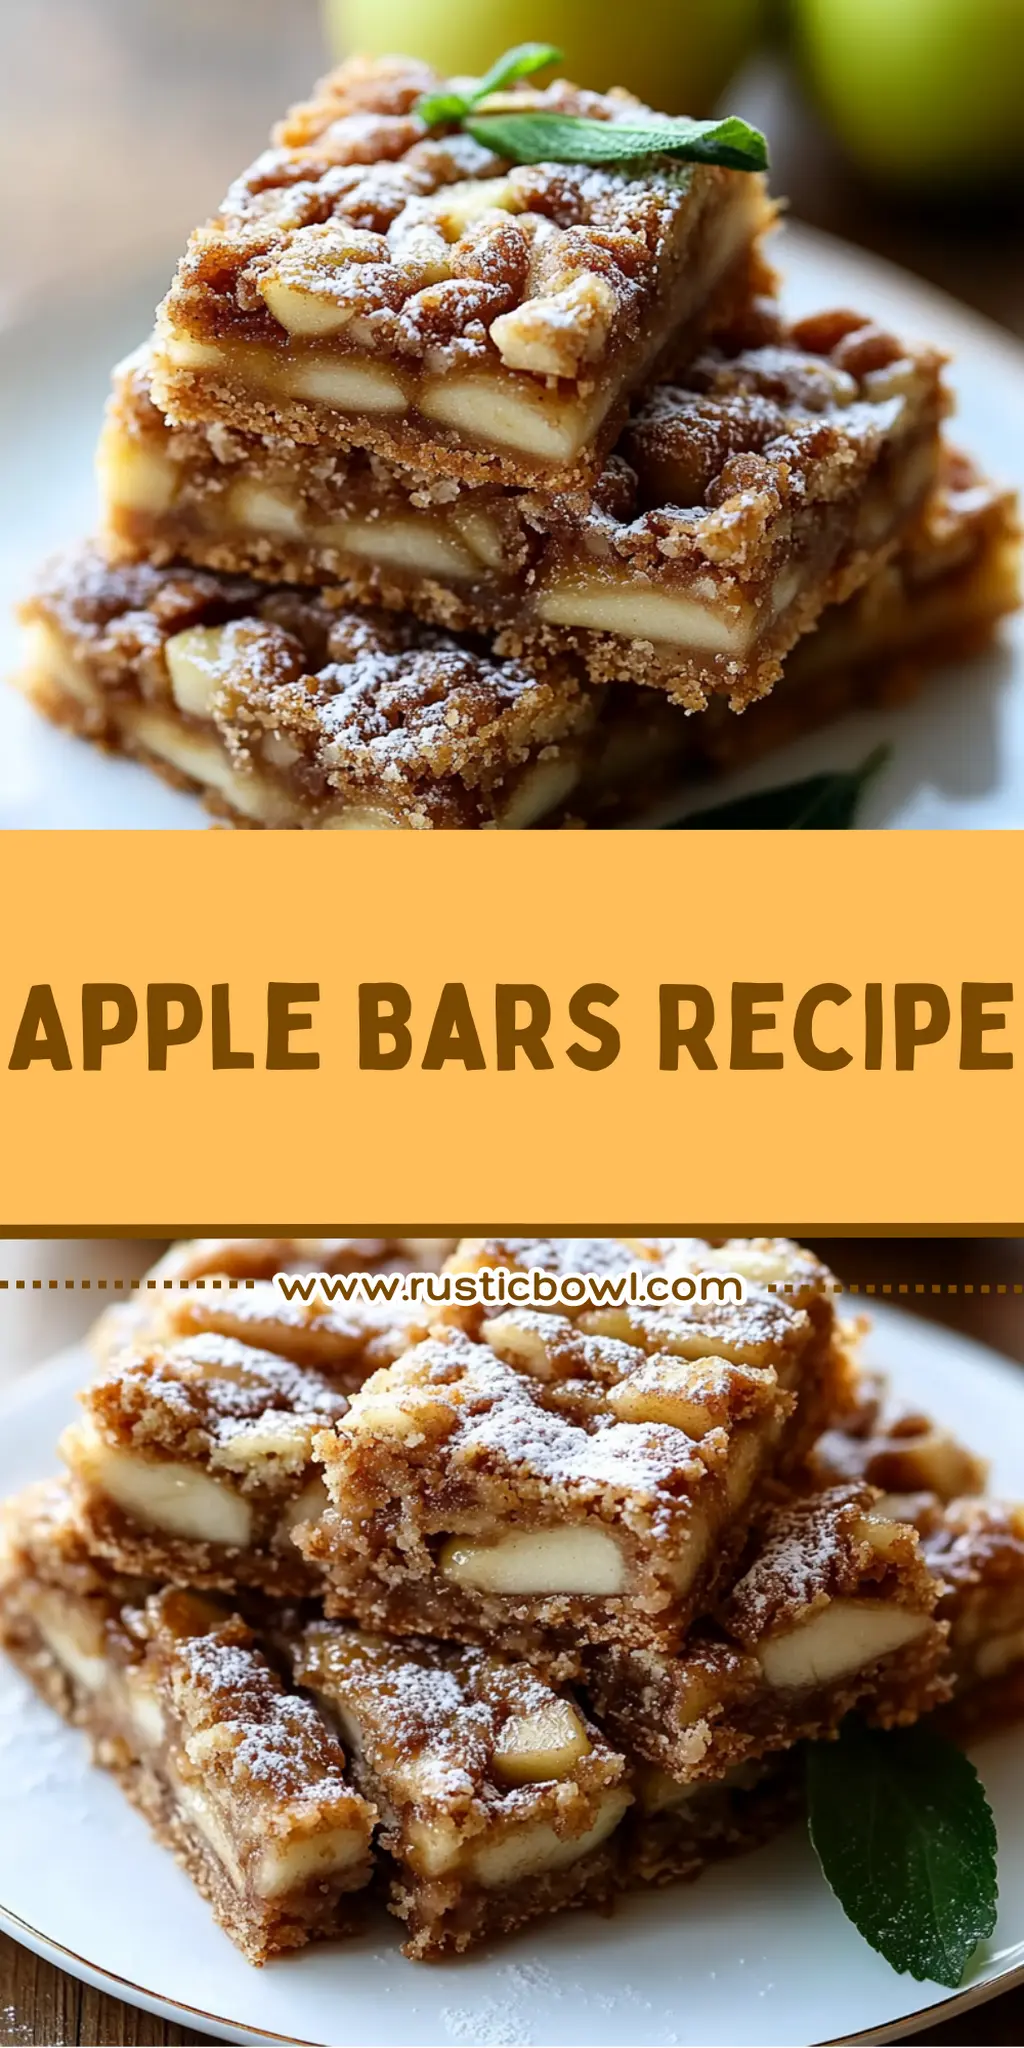
There’s something undeniably comforting about the smell of freshly baked apple bars wafting through the kitchen. It reminds me of cozy fall afternoons spent picking apples and experimenting with easy dessert recipes. This Apple Bars Recipe is a delightful way to transform those crisp, sweet apples into a treat that will have your family begging for seconds. With layers of buttery goodness, cinnamon-kissed oats, and tender apple slices, each bite feels like a hug in dessert form.
I discovered this gem during a late-night baking spree, desperate to find something new to enjoy instead of the usual fast-food options. The result? A deliciously simple and versatile treat that pairs perfectly with evening tea or as a dessert to share with friends. What I love most about these apple bars is their adaptability; they’re just as great for a summer barbecue as they are for a cozy winter gathering. So roll up your sleeves, gather those apples, and let’s create something heartwarming together!
Why You'll Love This Apple Bars Recipe
- This Apple Bars Recipe is incredibly easy to make, requiring just 15 minutes of prep time and about 30-35 minutes of baking, making it a perfect choice when you’re short on time.
- The delightful blend of sweet apples and cinnamon creates a flavor profile that is both comforting and satisfying, ensuring everyone will be asking for the recipe.
- With its versatile nature, you can serve these bars at any occasion, from summer picnics to holiday gatherings, impressing family and friends alike.
- Not to mention, the golden edges and visually appealing layers of fruit and oats make for a stunning dessert that looks as good as it tastes.
Apple Bars Recipe Ingredients
Here’s everything you need to whip up these delightful Apple Bars!
For the Batter
- 3 cups apples – Granny Smith or Honeycrisp are ideal for a perfect balance of tartness and sweetness.
- 1 cup unsalted butter – Softened for easy mixing and a rich, creamy texture.
- 1 cup brown sugar – Adds depth and a hint of caramel flavor to the bars.
- 1 teaspoon vanilla extract – Enhances the sweetness and aroma of the Apple Bars recipe.
- 2 cups all-purpose flour – Use a gluten-free flour blend for a gluten-free option if desired.
- 1 cup rolled oats – Provides a hearty, chewy texture and complements the apples beautifully.
- 1 teaspoon cinnamon – Infuses warmth and spice, making each bite comforting and delicious.
- 2 tablespoons sugar – For sprinkling on top to achieve a lovely caramelized finish.
- A pinch of salt – Balances the sweetness and enhances the overall flavor.
For Serving (optional)
- Vanilla ice cream – A scoop on top makes these bars even more indulgent.
- Whipped cream – Perfect for a light and airy accompaniment to the bars.
Gather these ingredients and get ready to delight in the warm, aromatic goodness of your homemade Apple Bars!
How to Make Apple Bars
-
Preheat your oven to 350°F (175°C). This ensures even baking for our delicious apple bars, creating a lovely golden crust.
-
Grease a 9×13 inch baking dish with butter or line it with parchment paper. This will prevent the bars from sticking and make for easier serving.
-
Cream together 1 cup of softened butter, 1 cup of brown sugar, and 1 teaspoon of vanilla extract in a large mixing bowl. Beat until creamy and fluffy, about 2-3 minutes, and enjoy the sweet aroma filling your kitchen.
-
Combine gradually 2 cups of all-purpose flour, 1 cup of rolled oats, 1 teaspoon of cinnamon, and a pinch of salt into the butter mixture. Mix until everything is well incorporated and the batter is slightly thick.
-
Prepare your apples by peeling, coring, and slicing about 3 cups of them. Toss the apple slices in a bowl with 2 tablespoons of sugar and an additional teaspoon of cinnamon to coat them evenly.
-
Fold the apple mixture into the batter gently, ensuring the apples are evenly distributed throughout for every delicious bite.
-
Pour the apple mixture into the prepared baking dish, spreading it out evenly with a spatula to help it bake uniformly.
-
Bake in the preheated oven for 30-35 minutes, or until the edges are golden brown and a toothpick inserted in the center comes out clean. Keep an eye on them: the aroma will let you know they are nearly ready!
-
Cool the bars in the pan for about 10 minutes once baked. Then, carefully transfer them to a wire rack to cool completely before cutting into squares or bars.
-
Enjoy your delicious homemade Apple Bars! They’re perfect for snacking or serving at gatherings—everyone will be asking for seconds!
Optional: Serve warm with vanilla ice cream for an extra indulgent treat.
Exact quantities are listed in the recipe card below.
What to Serve with Apple Bars?
There’s something truly special about crafting a comforting meal around your delicious apple bars that beckons family and friends to gather and enjoy.
-
Vanilla Ice Cream: A scoop on top brings creamy indulgence that complements the warm, spiced flavors of the bars.
-
Caramel Sauce: Drizzle this sweet sauce over the bars for an added layer of richness that harmonizes beautifully with the apples.
-
Whipped Cream: Light and airy, this classic topping adds a delightful contrast to the hearty texture of the apple bars.
-
Cinnamon Tea: This warm drink replicates the bar’s cozy spices, enhancing the overall comfort-food experience.
-
Fresh Fruit Salad: A medley of fruits adds a refreshing element, balancing the sweetness of the apple bars and keeping the meal light.
-
Chai Latte: The aromatic spices in chai create a warm, inviting pairing, making it a lovely accompaniment for a cozy afternoon treat.
-
Maple Syrup: Pour a little over your bars for a touch of sweetness that’s reminiscent of a cozy breakfast, elevating them to new heights.
-
Pecan Pie Bars: Introducing another layer of dessert creates a wonderful spread that showcases seasonal flavors perfectly.
Gather your friends and family around the table, and let these pairings make your apple bars the centerpiece of a heartwarming gathering!
How to Store and Freeze Apple Bars
Room Temperature: Keep your Apple Bars in an airtight container at room temperature for up to 3 days to maintain their freshness and flavor.
Fridge: If you’d like to enjoy your Apple Bars for longer, store them in the fridge in an airtight container for up to 7 days, keeping them moist.
Freezer: For long-term storage, freeze individual bars wrapped tightly in plastic wrap and placed in a freezer-safe bag. They can last up to 3 months in the freezer.
Reheating: To enjoy your Apple Bars warm, reheat in the microwave for about 20-30 seconds or in the oven at 350°F (175°C) for 10-15 minutes, until warmed through.
Make Ahead Options
These Apple Bars are perfect for meal prep enthusiasts looking to save time during busy weeknights! You can peel and slice the apples up to 24 hours in advance; just toss them with a bit of lemon juice to prevent browning. Additionally, the batter can be prepared a day ahead and stored in the refrigerator for up to 3 days. When you’re ready to bake, simply pour the apple mixture into the prepared baking dish and follow the baking instructions. This way, you’ll enjoy the same delicious quality while saving time on dessert preparation, ensuring that each bite of your homemade Apple Bars is just as comforting and delightful as when freshly made!
Apple Bars Variations
Feel free to stir up delightful twists on this classic recipe to make it uniquely yours!
-
Gluten-Free: Substitute all-purpose flour with a 1:1 gluten-free flour blend for a gluten-free-friendly version.
-
Nutty Crunch: Add 1/2 cup of chopped nuts, like walnuts or pecans, for an extra crunch and rich flavor in every bite.
-
Dried Fruit Delight: Mix in 1/2 cup of dried cranberries or raisins with the apple filling for a burst of sweetness and texture.
-
Spiced Up: Enhance the flavor by adding 1/4 teaspoon of nutmeg or ginger, bringing warmth and depth to your dessert.
-
Coconut Twist: Substitute half of the oats with unsweetened shredded coconut for a tropical flair that pairs beautifully with the apples.
-
Maple Sweetness: Replace brown sugar with maple syrup for a deeper, more complex flavor profile that elevates these bars.
-
Zesty Lemon: For a refreshing twist, add the zest of one lemon to the apple mixture, giving it a bright, tangy flavor that contrasts nicely with the sweetness.
-
Chocolate Drizzle: Drizzle melted chocolate over the cooled bars for a decadent topping that will take these treats to an entirely new level.
Chef's Helpful Tips
- When making Apple Bars, be sure to use a mix of Granny Smith and Honeycrisp apples for the perfect balance of tartness and sweetness.
- Avoid overmixing the batter after adding the dry ingredients, as this can lead to denser bars instead of a light and chewy texture.
- For a flavorful twist, try incorporating a touch of nutmeg along with the cinnamon to enhance the overall aroma.
- Always check for doneness a few minutes early to avoid overbaking; the edges should be golden and a toothpick should come out clean.
Apple Bars Recipe FAQs
What kind of apples work best for this recipe?
Absolutely! Granny Smith and Honeycrisp apples are the stars of this Apple Bars Recipe. Granny Smith offers that perfect tartness, while Honeycrisp brings a delightful sweetness—a perfect balance for these delicious bars.
How do I store leftover Apple Bars?
You can keep your Apple Bars in an airtight container at room temperature for up to 3 days. If you want them to last a bit longer, move them to the fridge, where they’ll stay fresh for up to 7 days. Just remember, keeping them airtight helps maintain their lovely moisture!
Can I freeze Apple Bars? How?
Very easy! To freeze your Apple Bars, wrap each bar tightly in plastic wrap, ensuring no air gets in. Then, place them in a freezer-safe bag or container. They can be frozen for up to 3 months! When you’re ready to enjoy, just take them out and reheat.
What should I do if my batter is too thick?
If your batter seems too thick, you can add a tablespoon of milk at a time until it loosens up to a spreadable consistency. Just be careful not to add too much at once! Mixing in a little at a time helps achieve the perfect texture for your Apple Bars.
Are these Apple Bars suitable for those with dietary restrictions?
Absolutely! For a gluten-free option, simply swap in a gluten-free flour blend instead of regular all-purpose flour. Additionally, you may substitute the butter with a plant-based alternative for a dairy-free version. However, always ensure that your oats are gluten-free if you have a gluten intolerance!
Equipment
- 9x13 inch baking dish
- mixing bowl
- spatula
Ingredients
For the Batter
- 3 cups apples Granny Smith or Honeycrisp, peeled and sliced
- 1 cup unsalted butter Softened
- 1 cup brown sugar
- 1 teaspoon vanilla extract
- 2 cups all-purpose flour Gluten-free option available
- 1 cup rolled oats
- 1 teaspoon cinnamon Plus additional for coating apples
- 2 tablespoons sugar For topping
- a pinch salt
For Serving (optional)
- 1 scoop vanilla ice cream
- 1 serving whipped cream
Instructions
How to Make Apple Bars
- Preheat your oven to 350°F (175°C).
- Grease a 9x13 inch baking dish with butter or line it with parchment paper.
- Cream together 1 cup of softened butter, 1 cup of brown sugar, and 1 teaspoon of vanilla extract in a large mixing bowl until creamy and fluffy.
- Gradually combine 2 cups of all-purpose flour, 1 cup of rolled oats, 1 teaspoon of cinnamon, and a pinch of salt into the butter mixture.
- Prepare your apples by peeling, coring, and slicing about 3 cups of them. Toss apple slices with 2 tablespoons of sugar and an additional teaspoon of cinnamon.
- Fold the apple mixture into the batter gently.
- Pour the apple mixture into the prepared baking dish, spreading it out evenly.
- Bake in the preheated oven for 30-35 minutes, or until golden brown.
- Cool the bars in the pan for about 10 minutes, then transfer to a wire rack to cool completely.
- Enjoy your delicious homemade Apple Bars!

Leave a Comment